The future is IPv6.
A future where NAT is no longer a necessary evil, a future with simpler subnetting, and a future where network auto-configuration doesn’t have to be reliant on a server. You can just imagine my dismay when I found out that my ISP at home was not able to supply me with IPv6 connectivity.
Well, I wasn’t going to let that stop me. I found out about a free service offered by Hurricane Electric that enables networks with only native IPv4 connectivity to access the IPv6 internet by establishing a 6in4 tunnel to Hurricane Electric’s tunnel broker routers. Even more, the service will provide you with up to a /48 prefix (which is better than nearly all residential ISPs) and even will let you advertise your own PI (provider independent) prefixes by establishing an eBGP session with their routers–at no cost!
However, using Hurricane Electric’s tunnel broker to connect to the IPv6 internet does have some major caveats: The most obvious impact is latency since IPv6 traffic going in and out must be routed through the tunnel broker router in Fremont (which means the baseline latency to any IPv6 destination is about 22ms in my case). Secondly, my network will be more susceptible to Internet congestion when using IPv6. This is because it will be entirely reliant on my ISP’s inbound and outbound routes with Hurricane Electric in Fremont. That, and any packet loss has an amplified impact on TCP throughput due to the higher baseline latency. Thirdly, my IPv6 connectivity will be strictly single-homed with Hurricane Electric, which has no connectivity with Cogent (AS174) or any AS that’s single-homed with Cogent as its upstream.
That aside, here’s what I did to bring IPv6 to my home:
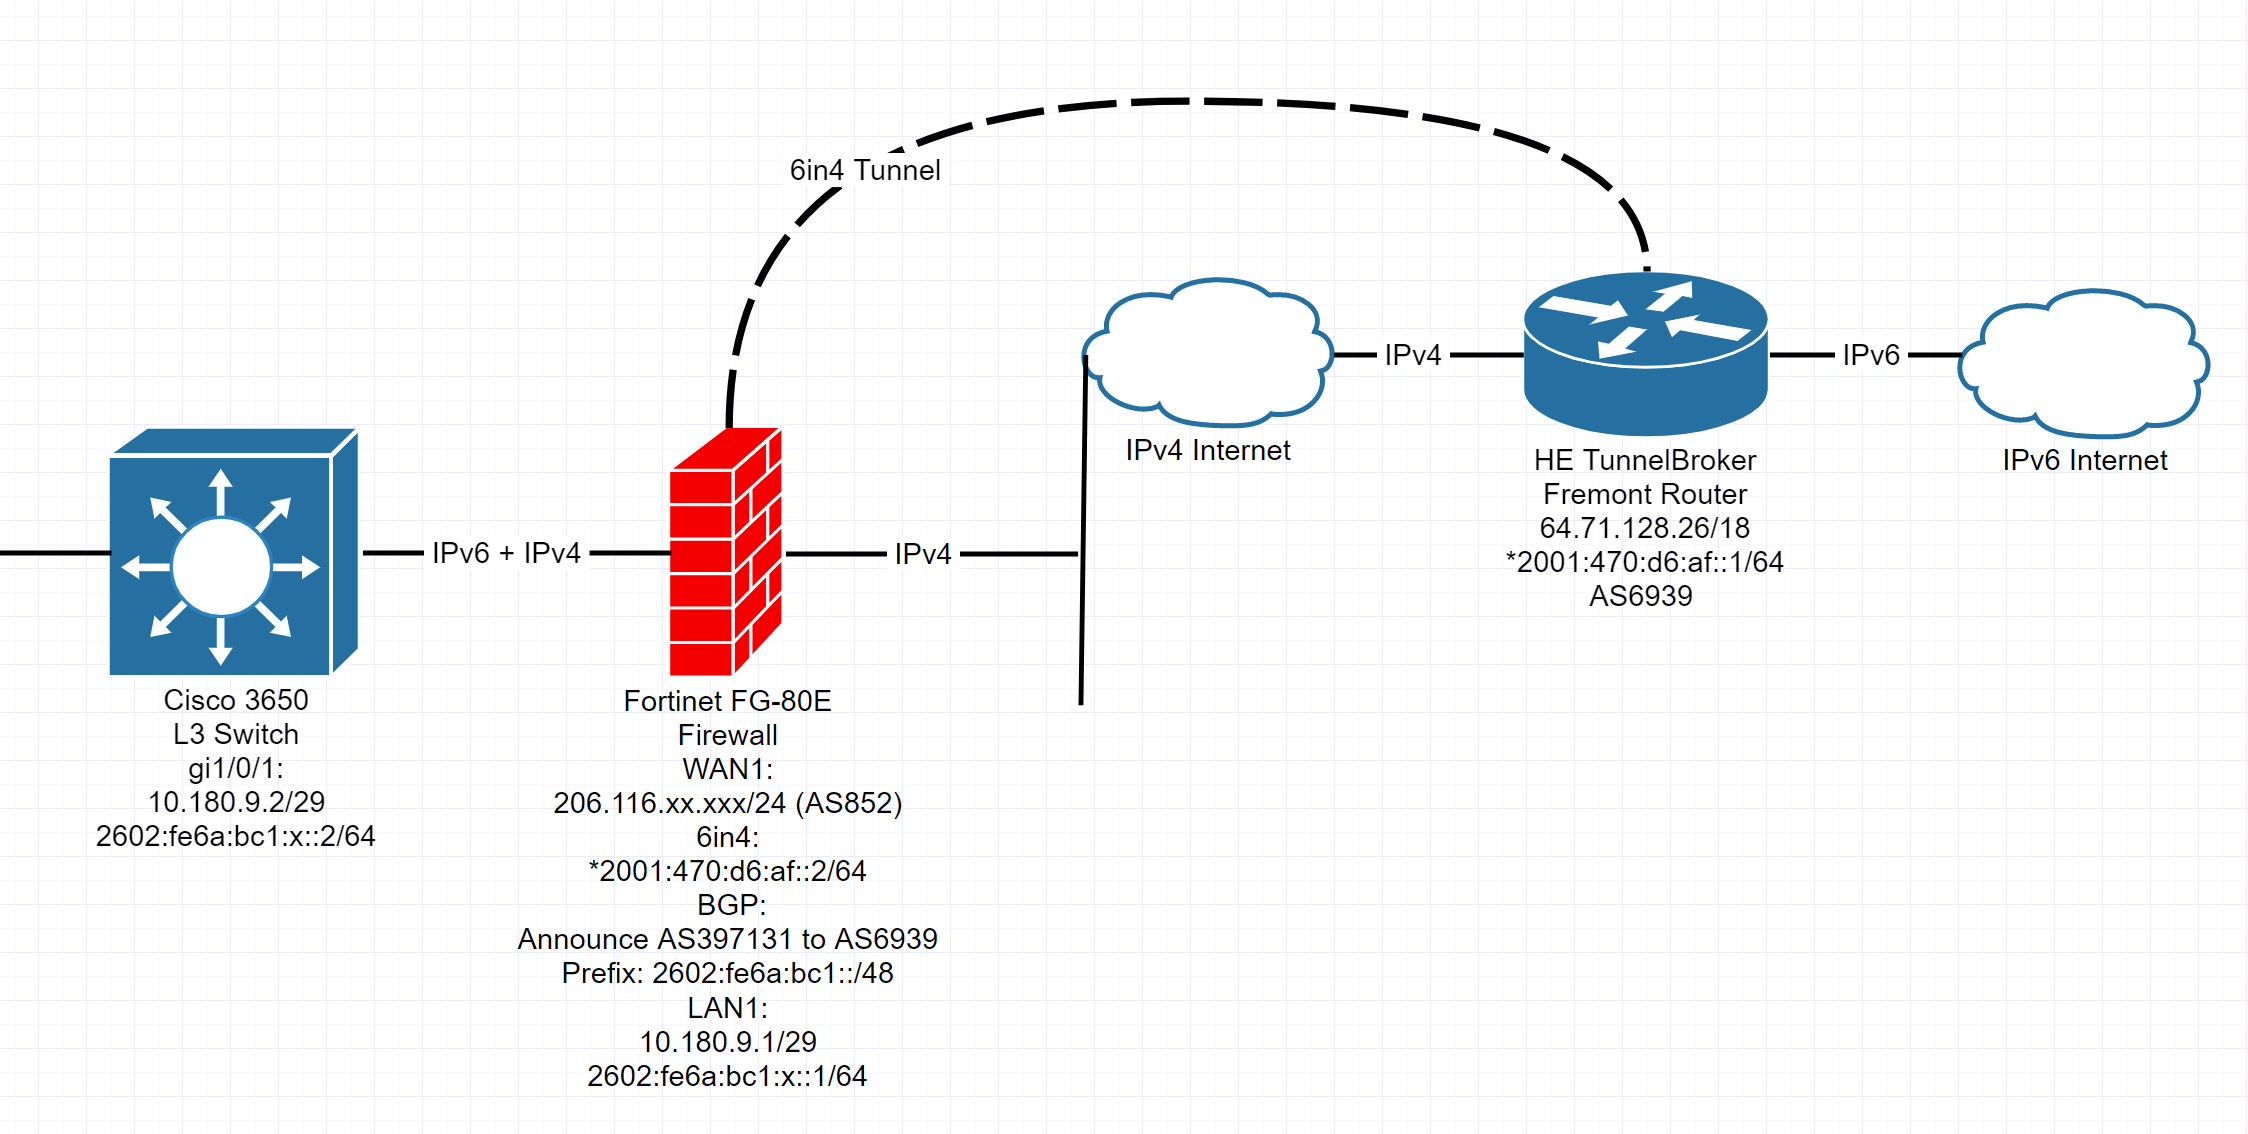
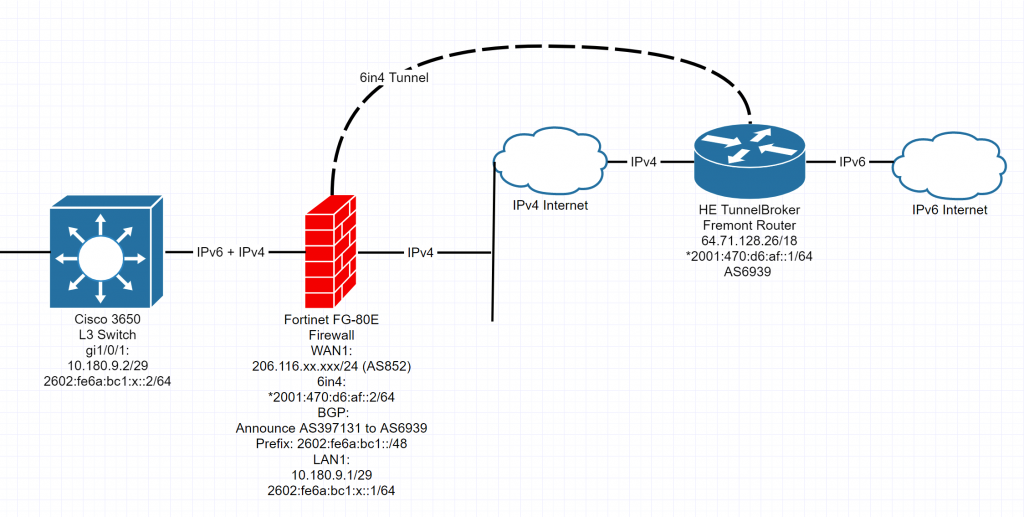
I terminated the 6in4 tunnel from Hurricane Electric to my home network’s firewall/router, a Fortinet FG-80E running FortiOS 6.0.5. I also happened to already have an ASN (Autonomous System Number) and a decent sized (/36) IPv6 block issued to me from ARIN, the regional internet registry for North America. So I decided to take advantage of the opportunity to advertise a small portion (/48) of it to the Internet over the 6in4 tunnel. Using my own PI IPv6 space also has some advantages over using a /48 issued by Hurricane Electric. For one, my IPv6 space is registered to an address in my region (Vancouver, BC) so sites will be able to provide me with locally relevant data rather than showing content for those in the SF Bay area. And secondly, many streaming sites that support IPv6 (such as Netflix) blacklist the IPv6 space that Hurricane Electric issues for tunnel broker users because they deem it as an “unblocker or proxy” considering it could potentially provide region restricted content to users outside of that particular region.
To get there, here were the steps:
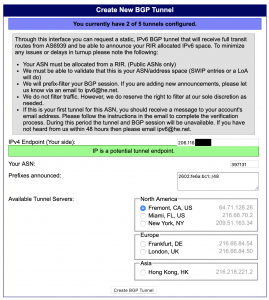
- I registered for an account on tunnelbroker.net and created a new “BGP Tunnel”, filling out all the necessary fields
- I then received an email requesting a LoA (Letter of Authorization) for the advertised prefix and that these prefixes must have an IRR record associated with them (citing your ASN)
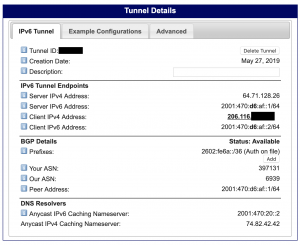
- Once that was done and approved, I was able to see the tunnel with the prefix approved on the tunnel broker site. The page also included the necessary details to setup the tunnel and BGP session
- The next step was to configure the 6in4 tunnel on the Fortinet firewall using these following commands (FortiOS still has very limited IPv6 configurability in the GUI)


config system sit-tunnel
edit “Hurricane”
set source 206.116.xx.xxx
set destination 64.71.128.26
set ip6 2001:470:d6:af::2/64
- Of course, the inside interface on the firewall didn’t have a IPv6 address yet, so I gave it one with the following commands
config system interface
edit “lan”
config ipv6
set ip6-address 2602:fe6a:bc1:x::1/64
set ip6-allowaccess ping
- Then I configured the static routes to allow IPv6 traffic to be properly handled by the firewall
config router static6
edit 1
set device “Hurricane”
edit 2
set dst 2602:fe6a:bc1::/48
set gateway 2602:fe6a:bc1:x::2
set device “lan”
- Now it was time to configure BGP on the firewall to advertise my IPv6 prefix
config router bgp
set as 397131
set router-id 206.116.xx.xxx
config neighbor
edit “2001:470:d6:af::1”
set allowas-in-enable6 enable
set remote-as 6939
config network6
edit 1
set prefix6 2602:fe6a:bc1::/48
config redistribute6 “static”
set status enable
- Then I needed to make IPv6 firewall policies to allow traffic out. I was able to do this in the GUI. It felt so good to set NAT to off.
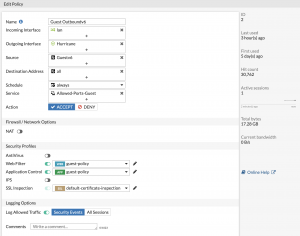
- If you look at the diagram (the first image in this page), you’ll notice that I still have a layer 3 switch behind the firewall, so now I had to configure that.
- First was to configure the interface connected to the Fortigate with an IPv6 address.

interface GigabitEthernet1/0/1
ipv6 address 2602:fe6a:bc1:x::2/64
-
- Then it was to enable IPv6 routing on the switch
ipv6 unicast-routing
-
- Then to configure the other interfaces that I wanted IPv6 connectivity on (here’s an example of one of them). You’ll also notice that I setup IPv6 with stateful DHCP instead of relying on SLAAC.
interface Vlanxx
ipv6 address 2602:fe6a:bc1:xx::1/64
ipv6 nd prefix default no-advertise
ipv6 nd managed-config flag
ipv6 dhcp relay destination 2602:fe6a:x:xxx:xxx
-
- Of course, IPv6 traffic won’t know where to go yet, so we need to setup routes. In this specific instance I used policy based routing instead of static routes (or a dynamic routing protocol) because I already had IPv6 (and routing for it) configured for certain interfaces on this switch already (traffic is routed to a different router than the fortigate, which has a tunnel established with my dual stack capable colocation in downtown Vancouver).
ipv6 access-list Guestv6
permit ipv6 2602:fe6a:bc1:xx::/64 any
route-map Guestv6 permit 30
description Route Guest IPv6 to Fortinet
match ipv6 address Guestv6
set ipv6 next-hop 2602:fe6a:bc1::x:1
interface Vlanxx
ipv6 policy route-map Guestv6
-
- Lastly, I configured a basic ACL to isolate the Guest IPv6 traffic from the rest of my IPv6 network
ipv6 access-list GuestIsolate
sequence 20 permit ipv6 any 2602:fe6a:a:xxx::/64
deny ipv6 any 2602:fe6a:a::/48
permit ipv6 any any
interface Vlanxx
ipv6 traffic-filter GuestIsolate in
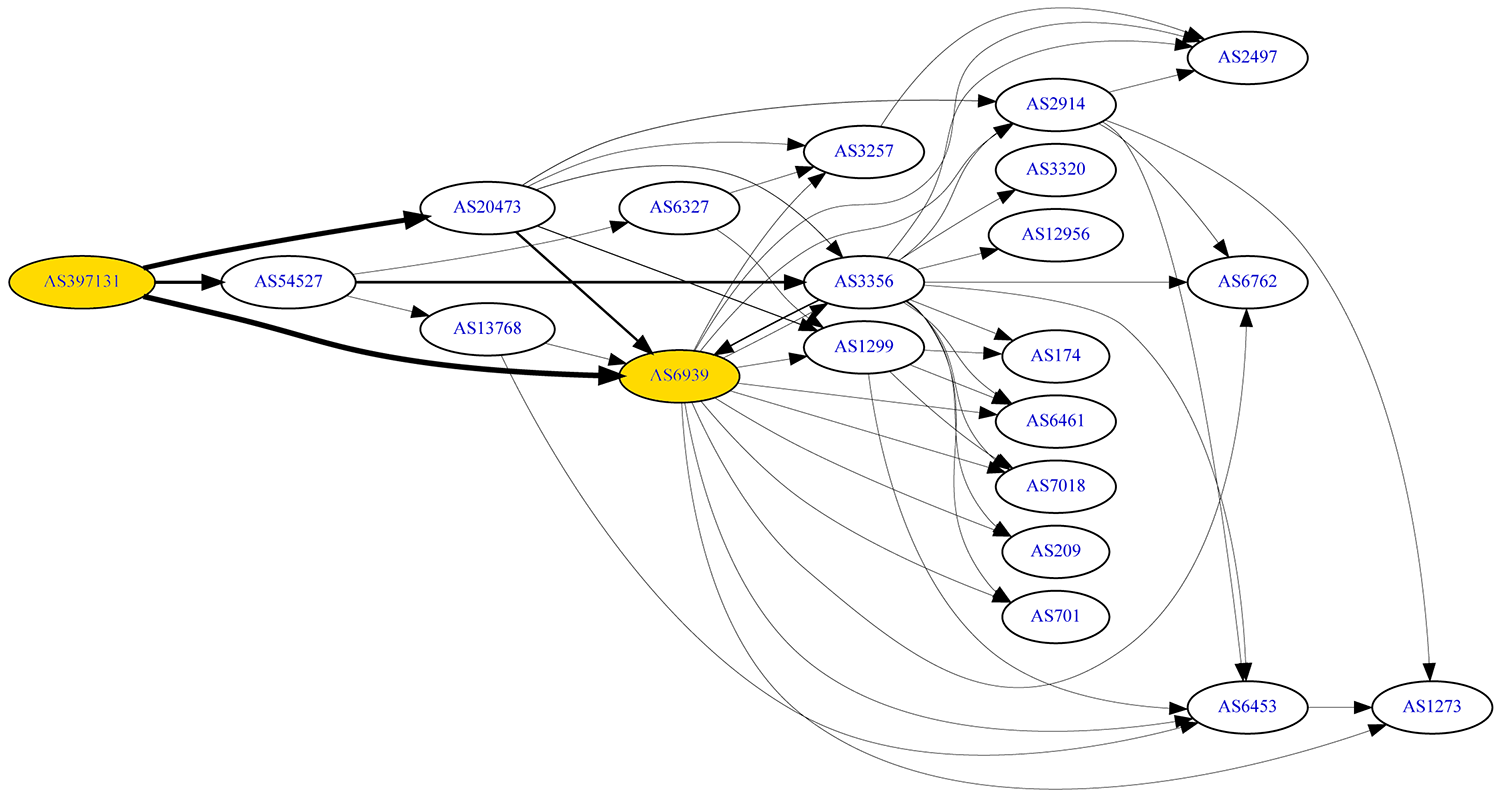
And that’s it! I am able to get most of the IPv6 internet from my IPv4-only internet connection at home at pretty much no additional cost. Below is an updated IPv6 BGP Graph of my ASN from Hurricane Electric’s own BGP toolkit. (I don’t have any BGP sessions with AS6939 anywhere else)
You might ask, “how well does it perform?”. I’m happy to say that I haven’t had any noticeable performance issues while using the Tunnelbroker versus without. Of course, given that I have been blessed with a symmetrical gigabit internet connection at home, this setup is still a bottleneck.
Most evidently (and covered earlier), is the latency overhead with sending all traffic to Hurricane Electric in Fremont. This is made worse because many sites and services resolve to IPv6 addresses located near me rather than near Fremont due to using IPv4 for DNS resolution. The reason is mostly due to latency; my recursive DNS resolver, OpenDNS, has a PoP locally in Vancouver and my ISP (Telus) peers with it. Sending my DNS requests over IPv6 would not just take longer to resolve the DNS queries, but still deliver unoptimal resolutions because of two things, RFC 7871 (Client Subnet in DNS Queries) and because many sites still have no IPv6 support. RFC 7871/EDNS Client Subnet means that DNS queries can be resolved based on geolocation data for my IPv6 prefix, which as you know, is located to Vancouver, Canada. And if a DNS server does not support EDNS Client Subnet, resolving A records will still result in non-optimal resolutions. That’s on top of the aforementioned additional latency added to the DNS resolution process (due to connecting to a farther away server).
Secondly, I noticed that IPv6 traffic was unable to be hardware offloaded on the Fortigate. My guess is that this is purely due to the 6in4 tunnel since Fortinet claims that this firewall (with the NP6lite) should typically support offloading IPv6 traffic.
In testing, I have been able to reliably receive well over 200mbps of throughput to the IPv6 internet–both for upload and download. For instance, downloading the 10GB testfile from Leaseweb’s anycast mirror over https (reaches its San Francisco mirror) yields download speeds around 300mbps for a single thread (peaking at around 400mbps), an Ookla Speedtest to Telus in Vancouver (traffic goes back and forth from Vancouver to Fremont with ~46ms latency) yields a download speed of 369mbps and an upload speed of 310mbps (with peaks to over 400mbps) and Fast.com (Netflix) results with download speeds of 320mbps and upload speeds of 220mbps. It’s far from perfect, but for many purposes, it’s fast enough.